


Zoom is a cloud-based web conferencing service that allows users to meet online and share content. Join a meeting from a PC, Mac, desktop, laptop or mobile device -- wherever you have an internet connection. (No need to connect to the ODU VPN.)
Getting Started
All ODU faculty, staff and students have access to Zoom Pro Licenses.
- go to odu.zoom.us
- click Sign In
- log in with your MIDAS ID and password
Zoom is available on all ODU-managed computers, either pre-installed or in the self-service portals. Available for personal download at zoom.us/download.
- launch the Zoom app
- select Sign In with SSO
- enter "ODU" when it asks for your company domain
- log in with your MIDAS ID and password
- click Sign In
- select Sign In with SSO
- enter "ODU" when it asks for your company domain
- log in with your MIDAS ID and password
Please NEVER drive while connected to Zoom
Access Zoom in Canvas with the Course Collaboration Tool. Schedule, start and manage meetings directly from the tool. Students can join meetings and access cloud recordings from within the course as well.
In order to use Zoom within the Course Collaboration Tool, you do need to log in to Zoom on the web first (odu.zoom.us). Log in with your MIDAS ID and password.
- University Zoom should only be used for University-related content. Personal accounts on Zoom are free and should be created with a non-ODU email address.
- Zoom supports the latest release of these browsers: Internet Explorer, Firefox, Chrome and Safari.
- Supported operating systems and system requirements for PC, Mac, and Linux.
- Minimum bandwidth requirements.
- Breakout Rooms require the Zoom desktop client or mobile client.
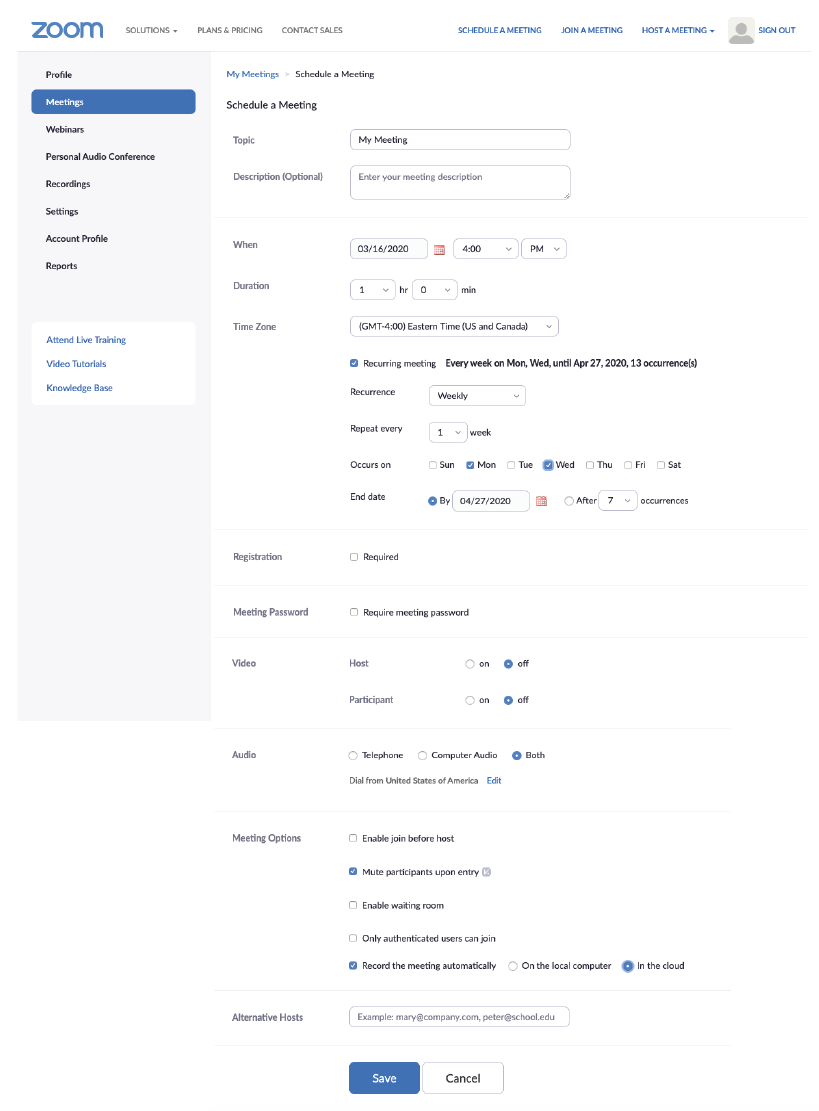
Schedule a Meeting
You can schedule meetings from the Course Collaboration Tool in Canvas, from the web, or from a Zoom app (desktop or mobile). No matter where you schedule your meetings from, we recommend:
- Set up a Recurring meeting for each course section you're teaching (rather than scheduling each class time in an individual meeting).
- Check Mute participants upon entry.
- Check Record the meeting automatically (in the cloud).
Zoom meetings will only show up in Canvas if they are scheduled from the Course Collaboration Tool in Canvas. Meetings scheduled outside of this tool (directly through the Zoom app, for example) will not appear in Canvas.
The ODU Course Collaboration Tool makes it easy to schedule Zoom meetings for all of your classes at once.
-
Go to odu.zoom.us and sign in.
-
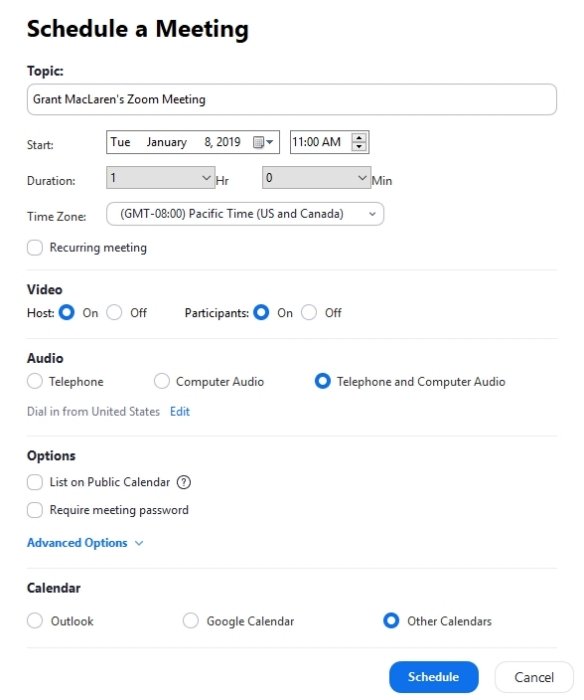
Click on Schedule a meeting at the top of the screen.

-
Select your meeting settings.
- Set up a Recurring meeting for each course section you're teaching (rather than scheduling each class time in an individual meeting).
- Check Mute participants upon entry
- Check Record the meeting automatically (in the cloud).
-
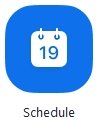
Open Zoom and sign in.
-
Click on the Schedule icon.
-
Select your meeting settings and click Schedule. (Some options might not be available if they were disabled at the account or group level.)
Students can join a scheduled meeting from the Course Collaboration Tool in Canvas or from the My Courses section of myODU after the session has started. They can only see and join meetings associated with their courses.
Alternately, faculty can copy the meeting link and add it anywhere within Canvas or email the link to all students.
Features
Anyone can join a Zoom meeting for free, but only pro account holders can access all of Zoom's meeting features.
You can access the meeting controls located at the bottom of the meeting window to share your screen, mute yourself or all participants, view the chat window, participants and more.
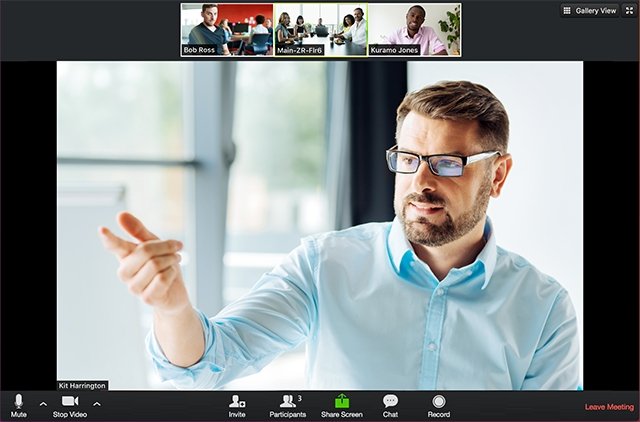
When screen-sharing, meeting controls move to the top of the screen.

Split your Zoom meeting into up to 50 separate sessions for small group work or discussion (Note - Breakout Rooms require the Zoom desktop client, or mobile client)
Type closed captions directly into Zoom or a third party service, or enable automatic transcription when recording to the cloud.
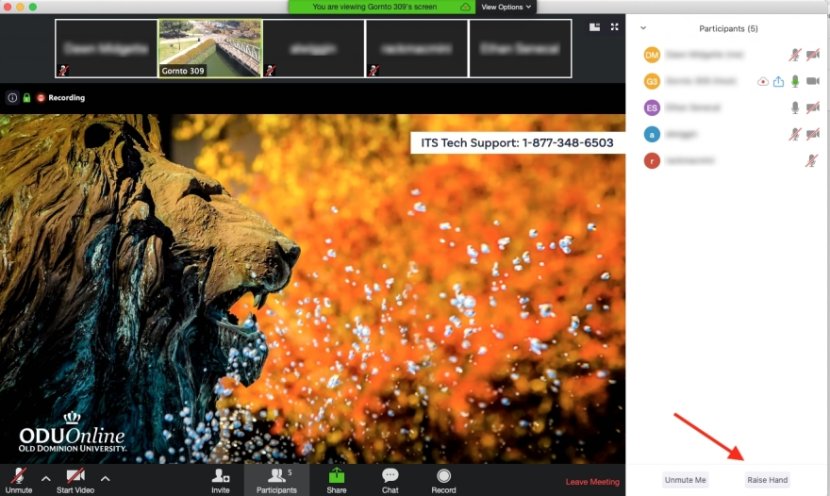
Attendees can click the Raise Hand button to indicate that they need something from the host.
- Click on Participants from the meeting controls.
- The Raise Hand button is at the bottom of the Participants window.
The Participant list shows all attendees in your Zoom meeting. Click on Participants in the meeting controls.
- Collaboration - Collaborate with up to 300 participants using chat, annotation, whiteboarding and breakout rooms.
- Screen and application sharing - Share your whole desktop or individual applications.
- Dynamic voice detection - Primary camera view automatically toggles to the active speaker.
- Scheduling - Browser, client and plugin scheduling options, including delegation for co-hosts and schedulers.
- Meet for as long as you like - There's no time limit.
Recordings
You can record meetings and save them to your computer or to the cloud. Cloud recordings are available from the Zoom website for 30 days and are automatically uploaded to Panopto. Recordings in Panopto may be viewed, edited or published to a course.
When scheduling a meeting (see above), you should:
- Set up a Recurring meeting for each course section you're teaching (rather than scheduling each class time in an individual meeting).
- Check Mute participants upon entry
- Check Record the meeting automatically (in the cloud).
If you've done this, your meeting is recorded automatically to the cloud. You can pause or stop the recording from the meeting controls at the bottom of the screen.
-
Start a meeting as the host.
-
Click the Record button in the Zoom toolbar.
-
Select Record to the Cloud.

-
To stop recording, click Pause/Stop Recording or End Meeting.

Zoom Audio
Computer Audio/VoIP (default)
To participate in a Zoom meeting, you can use the microphone and speakers connected to your computer or on your mobile device, or call into a meeting using Zoom's call-in numbers (included in all meeting invites). For more info on joining a meeting by phone, visit support.zoom.us/hc/en-us/articles/201362663-Joining-a-Meeting-by-Phone.
Zoom Premium Audio (optional)
For a fee, you can add additional audio options like toll-free call-in numbers and the ability to have Zoom call your number to connect you to the conference. To activate this optional service, submit a Telecommunications work order. For more info on premium audio features of Zoom, including per-minute rates, visit support.zoom.us/hc/en-us/articles/201362833-What-is-Premium-Audio-.
Resources
- Zoom Help Center
- Zoom Video Tutorials
- Getting Started with Zoom
- Using Zoom with Canvas
- Zoom: Securing Your Meetings
- Zoom: Breakout Rooms
- Zoom: Using Dual Monitors